

1. Introduction
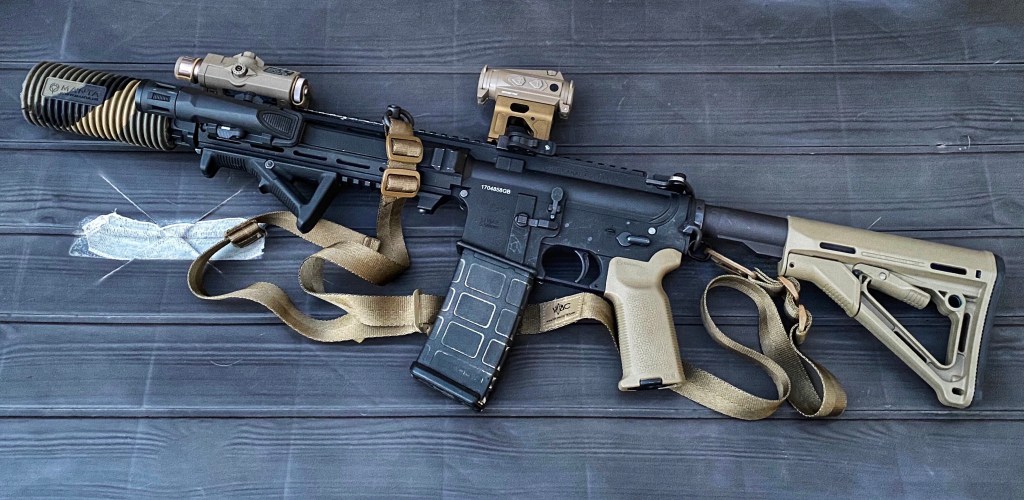
For such an expedient version of my Tackleberried HAO L119A2 Systema PTW, the build I’ve since renamed UXV1.0 (Unity eXperimental Version 1) received some unexpected and kind praise.

Initially a temporary configuration, engineered for my Unity Tactical FAST Micro Mount review; which of course meant that I needed to step outside what I consider to be the legitimate L119A2 clone envelope.

While the build has seen positive comments it’s not something I’d call a clone, because it’s perhaps one liberty too far.

For that reason the official version of my clone L119A2 build still sits at V2.6, in case anyone wants to check out what it looks like when I stick to my own rules.

That said, if I thought my L119A2 looked dire with the Unity mount, I would have defaulted to close up pics alone to illustrate the review – not pics of the whole gun.

Nevertheless, a few people have suggested that UXV1.0 needed an article of its own with a parts list; so that’s what I’ve done.

Some of it is lifted from earlier articles, so if it seems familiar that’s why. However, I don’t think many readers want to go digging in the blog’s archives to look at every single build iteration, so here it all is – consolidated.
2. Build Configuration
This section sets out my rationale where I’ve made decisions about build variables, e.g. where there is customisation or a choice of parts.

2.1 Ghetto Modded Ambi Charging Handle Latch
At its inception I worked with Tackleberry on a full list of requirements, for taking my L119A2 from an anonymous collection of parts to a personalised turnkey solution. These requirements included customisation options, an example of which is the work he carried out in ‘ghetto modding’ my RS Colt Canada ambi charging handle latch. Read more about that here.

Basically, the mod makes the latch less liable to hang up on stuff. It’s commonly seen in the wild and appears to be a user preference.
I don’t think there’s any right or wrong way to do it, but Tackleberry interpreted the reference material I provided to deliver something which perfectly meets my needs – and I think it looks good, too.
2.2 Magpul MOE K2 Grip
I decided as soon as I tried Tackleberry’s Magpul MOE K2 grip conversion for PTW on my old HAO HK416A5, that I couldn’t be without one on the L119A2. The ergonomics are just too much of a radical paradigm shift not to indulge. Fitting the rifle to the user is the whole point of optimisation – although for me it has to be balanced with looks.

This isn’t a cheap option due to the engineering required on the motor alone, but as an ergonomic upgrade it’s become an essential on my builds rather than a nice to have.

2.2.1 The Justification
The K2’s steeper angle completely transforms the biomechanics of rifle handling (along with commensurate stock adjustment and foregrip selection/location). For me, this ergonomic aspect far outweighs my admittedly heretical deviation from the Original Ergo; which is the factory config L119A2 grip.
As luck would have it, I think the K2 suits this build aesthetically.

2.3 Magpul CTR Stock
2.3.1 Stock Extension
Stock length was the first thing I checked with the Unity mount fitted, but it was found to be correct. It was originally set using the crook of arm method, which is a common yardstick used to derive extension. To learn more, check out Ronin Tactics’ video starting at 1:19 – Tu Lam is one of the method’s many professional proponents.

2.3.2 Stock Model
I tried a few different stocks including the Magpul MOE SL K. To be fair to the latter, for me the butt is just too short in height when used with the Unity mount – but it’s a fantastic stock that I really would have liked to have used.

In the end I stuck with the Magpul CTR. It’s very low bulk when compared with the ACS, but still delivers a good shoulder contact patch – although the ACS provided a more familiar weld.
The CTR easily is the most commonly seen L119A2 stock, because it’s the one that ships from the factory.
2.4 Magpul AFG2
Another ‘from the factory’ component. Over the years I’ve gone from bare rail to AFG/AFG2, to hand stop, to VFG, to rail cover and back around again any number of times on any number of builds. I can’t guarantee I won’t do it again.


Running a slick front end save for a Manta Very Low Pro cover in V2.6 of the build wasn’t perfect with the Unity mount, so I tested out the new configuration with a Magpul AFG2 and then a BCM VFG. The AFG2 won out.

2.5 Inforce WMLx Gen 2 White/IR
I stuck with the Inforce WMLx Gen 2 White/IR (in legit black, naturally). Notwithstanding, the look, legitness and ergonomics of the WMLx continues to speak to me.

The first person I know who used the WMLx White/IR Gen 2 on their L119A2 clone was perr_mike – one of the godfathers of the UKSF impression scene. John D had also given it the thumbs up in terms of function and intuitiveness, and though I’m loath to tell him he’s right, he’s right (aside from his colour choice. FDE? I mean WTF dude?!)
In fact, it turns out that quite a few of the people I trust say good things about the WML-series, including L119A2 guru Andy J of Andy’s Gas Works – another early adopter.
2.6 Magpul RSA QD and Magpul ASAP
2.6.1 ASAP
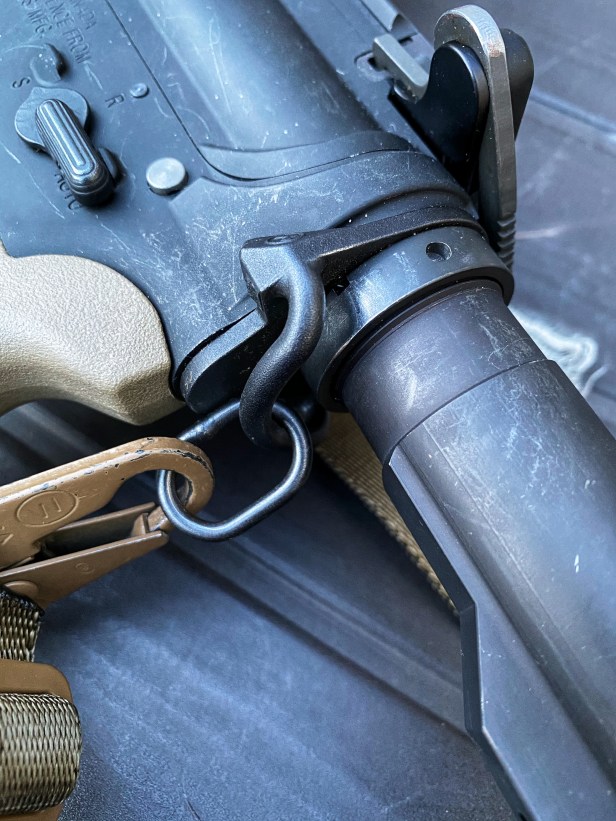
The Magpul ASAP is the factory L119A2 rear sling attachment point (as far as this L119A2 version is concerned – read more about L119A2 versions here). For me there’s no reason not to use it and in fairness it is a very good rear sling attachment point, being capable of ambidextrous use.
2.6.2 RSA QD

I’ve personally yet to see a Magpul RSA QD in a reference pic, but I’m told they are out there. However, it’s in use here as it helps tidy the sling attachment and it seems legit.
2.7 Viking Tactics (VTAC) Mk1 Two Point Adjustable Sling
The 1” webbing of VTAC’s sling is very low bulk compared to wide or padded slings; it just glides over kit. It feels more like it’s not there, unless you need it. Equally, given that this is no support gun, the sling is no less comfortable for being narrower.
2.7.1 Modifications
2.7.1.1 Ferro Pull Tab
I’m using my VTAC sling enhanced with a Ferro Concepts pull tab. The advantage of the latter is that it provides a really positive index point for adjustment.
2.7.1.2 BFG 1” QD Sling Swivel
The decision to go with a BFG 1” QD sling swivel at the front end was in no way essential, but it tidied things up and the RSA QD spans a fraction less of the top rail than the non-QD version. I was sick also of the bulky ITW snap hook up front, which is a pain to attach and detach.

Additionally, the RSA QD/BFG QD sling swivel combo makes the sling hang more to my liking when going hands free.
2.7.2 What Makes VTAC Slings Unique?
The VTAC Mk1 is the sling that started the adjustable 2-point revolution. It remains a design classic not least because it and its many variants do a couple of very useful things that no other 2-point adjustable sling does. This is why – despite its age – it’s still current.
The VTAC’s unique features are best articulated by the its originator, Kyle Lamb of Viking Tactics; quoted here speaking to The Loadout Room:
I don’t feel we have any real competitors. There are other adjustable 2-point slings, but they require removing the weight of the weapon from the sling to adjust and limit adjustment. Our sling can be cinched tighter and tighter and done with one hand, no matter the weight of the weapon.
Kyle Lamb
These features and more are demonstrated in the following video which, while dated, is really worth a look if you’re unfamiliar with the VTAC – or simply assume it’s just like all the other 2-points:
Click through to YouTube if the video doesn’t render above.
2.8 Sig Sauer Romeo 4T Optic
The Sig Sauer Romeo 4T is back on the build. It hasn’t featured since V1.4 because I’ve been using the reference pic ubiquitous Aimpoint Micro T2.


2.8.1 4T Or T2?
Switching between 4T and T2 while shooting paper in the garden, the circle dot reticule of 4T made me remember why originally I loved it. Plus, it suits the Unity mount.
But the actual reason for its use is because I wanted to keep the T2 zeroed as is, and separate for comparison with the Unity equipped 4T.


With all that said, I’ve been left with a conundrum because I absolutely prefer the height of the Unity mount over the legit lower third Aimpoint mount.

2.8.2 4T Benefits
While Obi Wan Nairobi was the catalyst which made me want to buy the 4T, it offers real functional utility for me. It combines the Aimpoint Micro’s weight and form factor with the usability of an EOTech reticule; i.e. the optic is small and light, and the reticule doesn’t turn into a comet like a red dot can do for those with an astigmatism (like me).
2.9 Suppressor and Manta Suppressor Cover
This took me by surprise. I added the clone correct Manta suppressor cover for looks, and found that the additional mass up front worked well.

2.9.1 Manta
There’s been some discussion over the Manta can cover in terms of its looks, and I think it’s one of those Marmite items that can’t help but polarise. Having said that, I’ve seen recently quite a few Manta-equipped L119A2 clone builds which look really modern and progressive.
2.9.2 Mock Suppressor
The mock suppressor itself is one of Bruno’s famous 3D printed variants, this time the more modern of the two Surefire FA556SA units.

Much as I admire the HAO 216A flash hider, I want to run suppressed without the additional weight. Bruno’s cans weigh less than alternatives and are even lighter than HAO’s hider. They are composed of tough plastic and very much pass the all important squint test.

So, I get a net weight loss and my L119A2’s report moderated with one cheap and cheerful solution. These things only cost about €25EU, direct from Bruno.
2.10 Jay Taranis’ UKSF Spec Label Kit
This is an absolute essential for turning your LA5 into an authentic-looking UKSF spec item. Even guys with real LA5s use these stickers.

I’m not the best at cutting out shapes with a scalpel or scissors, but applying these stickers makes a huge difference to how my LA5 looks. In one sheet, you get two instances of each of the three labels required.
3. Parts List
- Tackleberried Systema PTW
- HAO L119A2 full kit
- RS Colt Canada trigger guard
- RS Colt Canada six position receiver extension
- RS Colt Canada receiver extension nut
- RS Colt Canada ambi charging handle assembly
- RS Colt Canada ejector port cover assembly
- RS Inforce WMLx Gen 2 white/IR
- RS Magpul Magpul MOE K2 grip
- RS Magpul CTR stock
- RS Magpul AFG
- RS Magpul ASAP receiver end plate
- RS Magpul RSA QD forward sling mount
- RS Magpul Pmags converted by Tackleberry
- RS Manta Suppressor Cover
- RS Sig Sauer Romeo 4T
- RS Unity Tactical FAST Micro Mount
- RS Viking Tactics two point adjustable sling with Ferro pull tab
- Bruno’s Surefire FA556SA 3D printed replica suppressor
- Element LA5 with Jay Taranis’ UKSF spec label kit
