
Words and Pics: Jin
Some of my friends asked me, “Why build a toy gun instead of the real deal?”
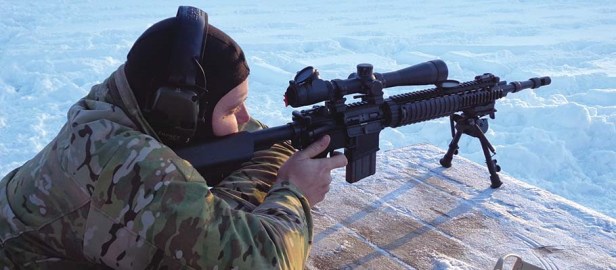
Basically, I wanted to put this rifle through some milsim action, rather than going to a government approved range to shoot some paper targets. The AR15 is restricted in Canada, which means you cannot shoot it on private property or when out hunting.
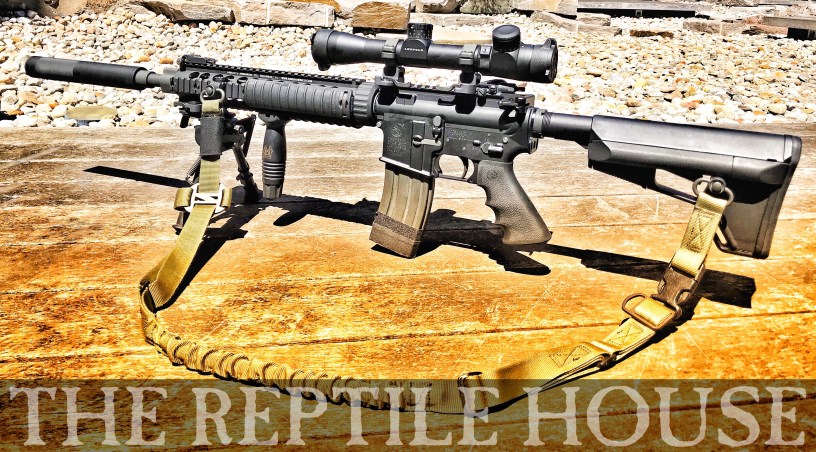
With this idea in mind, I decided to build my Mk12 Mod 1 as a PTW.
For me, the PTW is the perfect blend of reliability, usability, trigger response, accuracy, realistic features and – being 1:1 with the real steel – I can throw a bunch of real accessories on it.
Yes, it is a big investment – but it’s very much buy once, cry once.
Before I go into the details of my specific Mk12 setup, I would like to share some of the plaform’s history.
The 5th Special Forces Group envisioned a Special Purpose Receiver (SPR) which would drop-in on a standard M16/M4-type lower. This upper would be highly accurized and shoot a new type of 5.56x45mm round – one that would go on to be arguably the most accurate 5.56 cartridge in the world.
The SPR would be light weight and compact. It would provide long-range precision fire and light support capabilities to small groups: those who were not in a position to receive close-support from aircraft or artillery.
The SPR rifle went on to be known as the Mk12 and there are two basic models: the Mod 0 and Mod 1.
You can read more details on Small Arms Defense Journal.

Like many others, I was inspired to build this rifle by the book and film of Lone Survivor.
I knew it would be pain in the ass to source all the “clone correct” RS parts at the beginning of the build, but I went all in on this one anyway. It was expensive and in the end some compromises had to be made – but I have to say I don’t regret any of it.
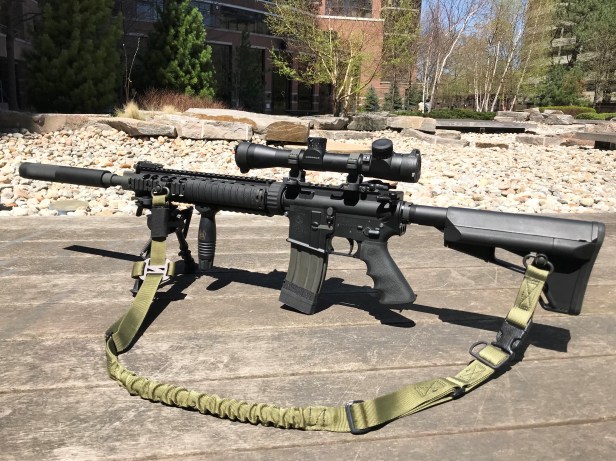
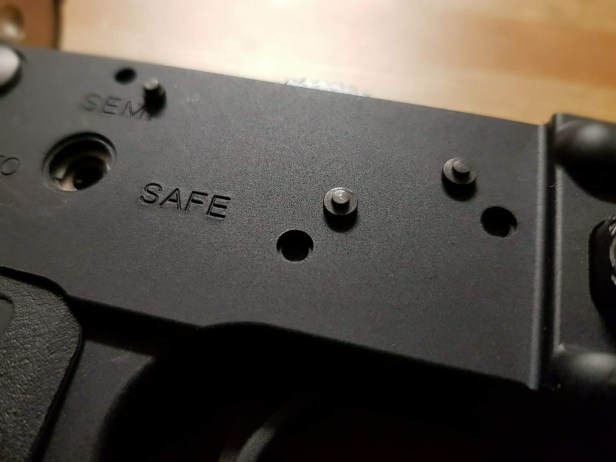
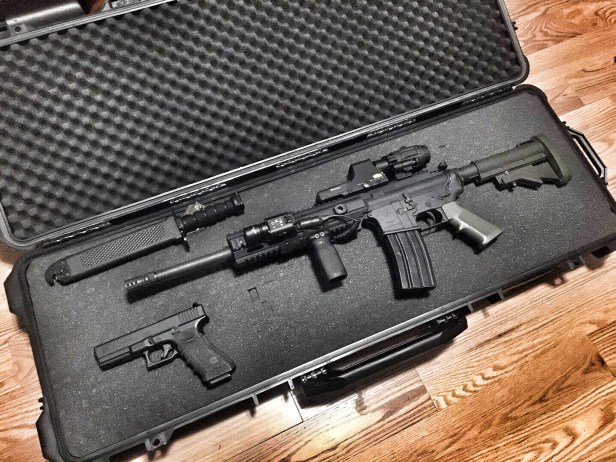
Let’s start with the receiver. It’s a HAO Colt M4A1. It’s made of 7075 T6 aluminium – the same material as a real AR receiver. It feels solid and the finish is spot on. There’s that slight tonal color difference between upper and lower – as seen on issued M4s – which is much sought after nowadays for reasons of authenticity. It is not Cerakoted, but anodised – like the real thing.
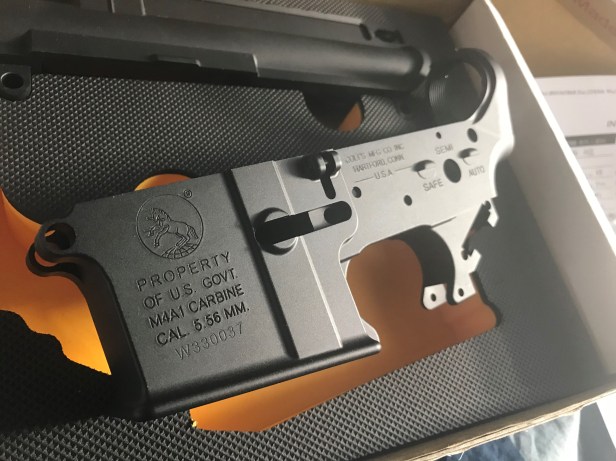
It appears that HAO has learned from its Battle Arms Development receivers, adding a small screw and thread on the back of the lower, where you insert the rear take down pin spring.
This makes it extremely convenient for the user to install the spring, without the stress of losing it.

Moreover, HAO has enlarged the contact patch between the fake pins and the receiver – to make sure that the fake pins adhere well.
Also, I have to say that the stamped (not engraved) markings on the receiver are just satisfying to look at.
Again, the real receivers are stamped – not engraved.
However, every product has its drawbacks.
As you can see from the comparison between a real Colt 6920 upper receiver and HAO’s, the real deal has a somewhat softer finish in general. This is because the real deal is forged and not CNC milled.
You won’t notice the difference if you don’t have a Colt receiver laying around, but this is my personal picky taste to point out such a detail.
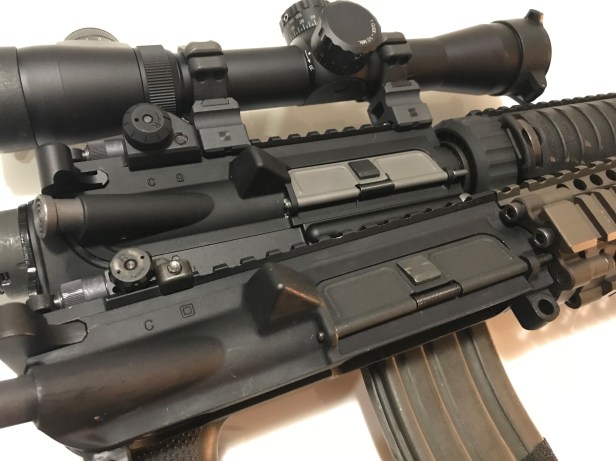
For the front end kit I used Zparts’ Mk12 steel barrel set. It’s heavy and looks convincing
Zparts did a nice little detail touch on the gas tube. They made it partially hollow, to represent that real gas tube look.
To install the barrel on the upper, I applied the same amount of torque on the barrel nut that I would on a real firearm; in this case, 40 ft-lb to line up the holes perfectly on the barrel nut and the upper. It is suggested to apply 30-80 ft-lb of torque on the barrel nut.
While I was doing this, I noticed a small “M4” marking on the receiver, which is correct on military application Colt receivers.

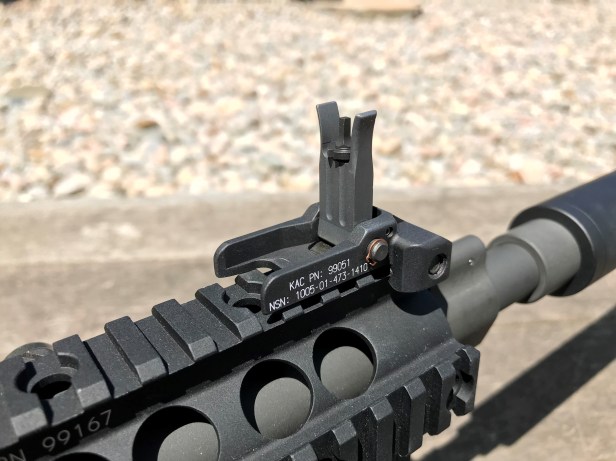
After this step, the KAC free float SR15/16 rail (KAC21318) was dropped in to place. A KAC front iron sight (KM99051) and a KAC QD sling swivel (KM98720) were also installed on the rail.

On the bottom of the rail, I went with the ARMS #32 bipod adapter and Harris bipod.

Unfortunately, I couldn’t find a real KAC vertical grip and I had to compromise with a GG&G one – currently very popular on the UKSF impression scene. There are a lot of fake KAC grips on eBay and I didn’t want to take the risk.
Yes – I could have gone with an airsoft replica as a placeholder, but one of the constraints I set for myself was to use as many RS parts as possible. It’s compromises like this which make the build your own.
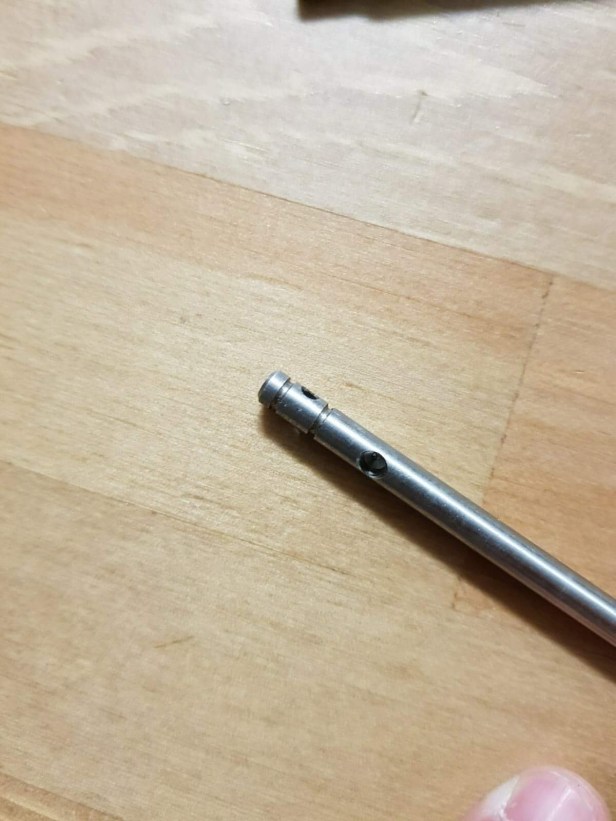
Next, an M84 PRI charging handle was installed. On the real rifle, this charging handle is specifically designed to prevent gas escaping into the shooter’s face. The whole system was designed to be used around the suppressor, which would mean some extra gas circulated in the upper.
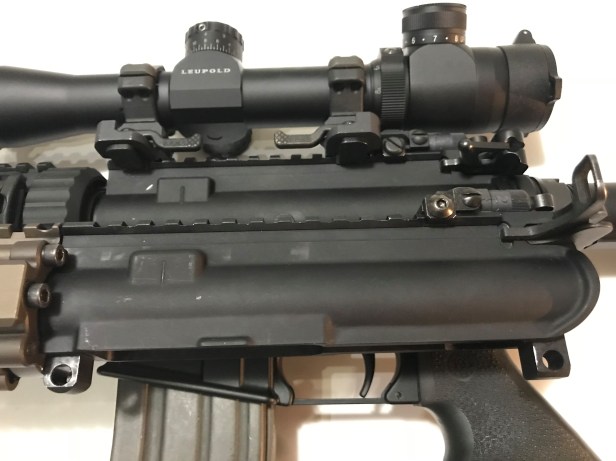
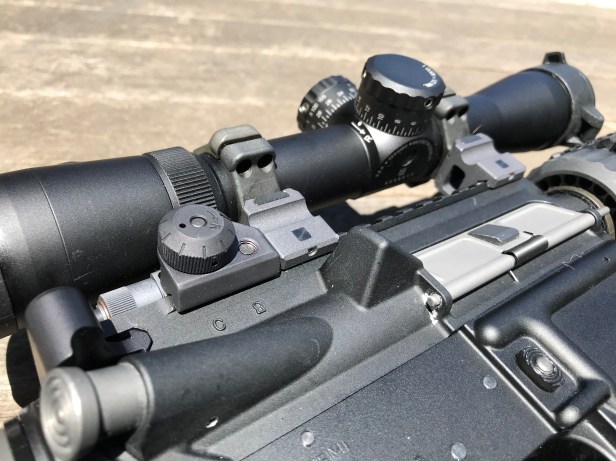
On the top of the rail, a KAC rear sight (KM98474) and a set of ARMS#22 High 30mm rings were installed.
I couldn’t find the early version of the ARMS rings without lever stops, so the current set was the only choice left. I will get to the scope later.

On the lower, a modified Hogue grip was installed as my tech support was not interested in modifying an Ergo grip. The Ergo is notoriously difficult (but not impossible) to convert for PTW.
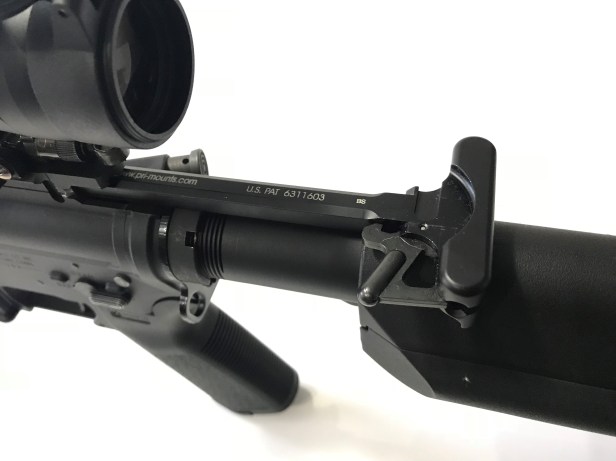
Let’s move on to the back of the rifle. The Colt A1 fixed stock should be used in this case, but the RS is extremely hard to find anywhere.
Instead – further making the build my own and keeping with the RS parts vibe – I went for a collapsible stock solution. I decided to modify a real Daniel Defense mil-spec buffer tube for this rifle.


The installation was easy and a Colt Canada end plate was used (the CQD end plate is basically not obtainable off the shelf in Canada).
The DD castle nut took 30 ft-lb of torque to snug the DD buffer tube nice and tight. Again, HAO’s lower did not fail to take the force – just like a real one. I slapped a Magpul ACS stock on here, because the real LMT SOPMOD stock is out of stock everywhere. I may replace the ACS with a B5 SOPMOD stock, some day.
There are a few optic choices for a Mk12 Mod 1 setup. The Leupold Mk4 MR/T 2.5-8×36 TS-30A2 – M2 turrets with MK262 BDC, Illuminated TMR reticle OR Nightforce 2.5-10×24 (optionally with Nightforce rings) were commonly used in the field.
I wanted to have a set up that was similar to Lone Survivor, so the Leupold was the way to go.

However, this optic is 100% unicorn to find these days, even if you live in the States.
Luckily, I found a similar Leupold scope that represents what the US military was originally using: the civilian version Mk4 MR/T 2.5-8×36.
It uses M2 turrets but it does not come with the MK262 BDC. I am pretty satisfied with this scope right now, because it looks identical to the TS-30A2.
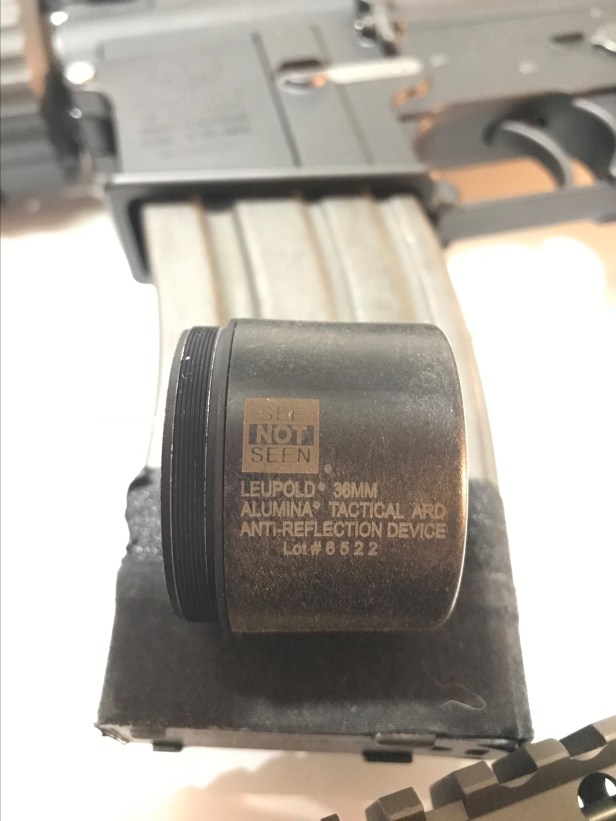
16-17 inch pound of torque was applied on ARMS ring screws, according to the recommend torque data from ARMS. The scope was properly aligned and I sourced a Leupold killflash for a more tacticool look.
The whole process of building this rifle lasted somewhere close to six months.
With all the research and reading of different source materials, I truly have a better understanding of Mk12 SPR program.
What’s more, I have met a whole host of friends from all kinds of professions and fields – and from both airsoft and real steel backgrounds.

Parts List
- HAO Colt M4A1 receiver set
- Zparts Mk12 Mod 1 steel barrel front kit
- Zparts Mk12 suppressor
- ARMS #32 bipod adapter
- Harris bipod
- GG&G AR15 vertical grip
- KAC QD sling swivel
- KAC SR15 free float rail
- KAC front folding sight
- KAC 200-600 meter flip-up rear sight
- ARMS #22 QD 30mm rings (high)
- Leupold Mark 4 MR/T 2.5-8x36mm
- PRI M84 charging handle
- Daniel Defense milspec buffer tube
- Daniel defense castle nut
- Colt Canada ambi end plate
- Magpul ACS milspec stock
- Savvy sniper quad sling
This is a project that I would never have been able to finish by myself.
Big thanks to my friend Miguel who helped me through the process of importing this amazing receiver set into Canada.
And big thanks to my buddies Roger, Chris and Bou Yan who modified different parts and finalized the whole set up.
Also thanks to Aztech Armory who sourced all the KAC unicorn goodies.
Last but not least, special thanks to Rich Norman who agreed to publish this article on his blog – The Reptile House.
A heads up on some of the things I will write in the future:
It is exciting for me that HAO is making the Colt Canada Gen 3 IUR for L119A2 builds.
I alrady have the Danish Military over-run IUR (on my RS C8 clone build), but I’ve recently ordered the UK contract over-run upper as well.
I cannot wait to compare the RS with HAO’s interpretation of the Gen 3 IUR.
