


By Mikezeronine

The Blaster
The base model of the gun is a TM recoil HK416 DEVGRU custom. I purchased this as it had a few nice parts straight out of the box that I would only buy later on if I had gotten the standard TM 416.
The overall project was always aimed towards a CAG/SFOD build. However, going by reference pictures is very hard to do because CAG take their “Silent Professionals” responsibility very seriously. As such, in the wild pictures are few and far between.

The Rail
With this being a CAG build, I couldn’t not get my hands on the HAO SMR 10.5″. The HAO is the ultimate in repro rails and it is almost indistiguishable from the RS. I learned about this on The Reptile House Blog!
Adding in an Optronics repro XPS3 sight, Element Surefire repro and genuine RS Magpul RVG finished the body off.
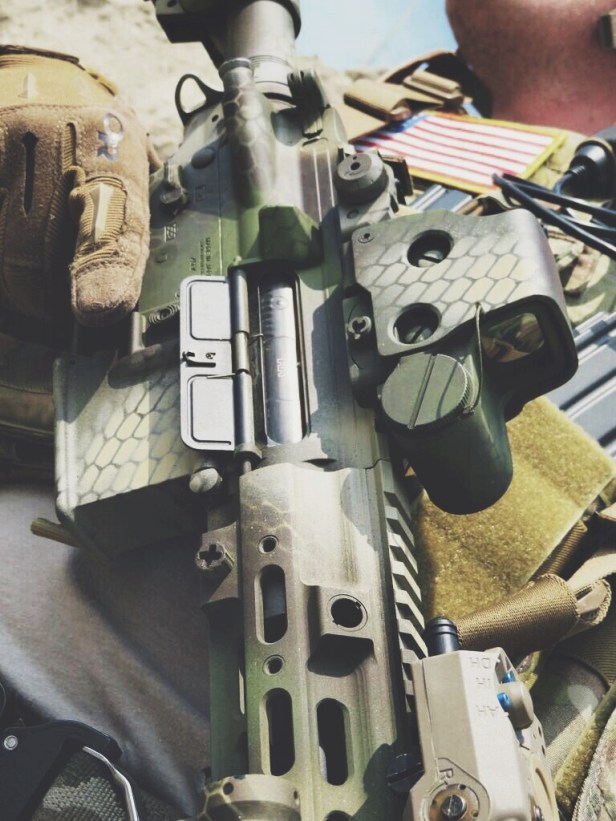
Paint
The thought of painting a fresh, squeaky clean build kind of made me cringe as I’m an avid “keep it clean” kinda person. The fact that I’d never painted a gun before made it even more daunting.
So, down to the nitty gritty. I had a need for something disruptive yet modern, but not a full on Kryptek or Pencott style. The answer was take the classic ‘scrim net job’ and put a twist on it.

Inspiration
Inspiration came from the guys over at TF Green; predominantly Seraph’s 416. Looking around at reference images on RS forums, TF Green’s blasters kept coming up, with people mistaking the team for ‘in the wild’ operators.
Colourway
Down to pacticalities and my first task was choosing the colourway. For me, this was easy: Multicam. I play in urban, woodland and arid conditions, so it made sense to go with Krylon olive, sand, khaki, woodland green and brown. Practice makes perfect so try your technique on anything black (because that’s the base you’ll be painting).

Surface Preparation
The next task was surface prep: cleaning any dust/debris off with a paper towel. Then doing a quick de-grease with an alcohol wipe and let it dry so the paint adheres properly to the surface.
Masking
Mask ALL items that you don’t want to paint. My prep time was 2.5 hours compared to 1.5 hours painting.
Base Coat
I used sand for this and covered the whole gun; only doing very light coats every 20 minutes and in total there were 3.
Pattern

The remaining colour placement is a free-for-all. Use sporadic movements and different angles with th eremaining paints. Spray lines, corners and overlap the colours.
To gain the pattern I used a large, but cheap, fish landing net that I paid £12 for! Not cheap, but not expensive to ruin. I Just chose where I wanted the colour to be, but used contrasting colours. So, brown over sand or woodland green over khaki etc. Use light colour on dark and vice versa.
In some areas the pattern was really defined, so I just went back over it with a different colour to knock down the definition without using the netting. I allowed 20 minutes and a very quick use of a hair dryer between applications of each colour.
Once I was fairly happy, I took it out into the sunlight. Anything I wasn’t happy with, I oversprayed.
Remember, if you’re going to try this technique, don’t go for a full patterned gun; just little bits here and there. Use the blending of colour. Its supposed to be disruptive and without any real bulk, shade or shape.In my opinion it came out pretty well and I’m mega happy with it.
-Mikzeronine out.
