

Words and pics: Jake Bycroft
Introduction
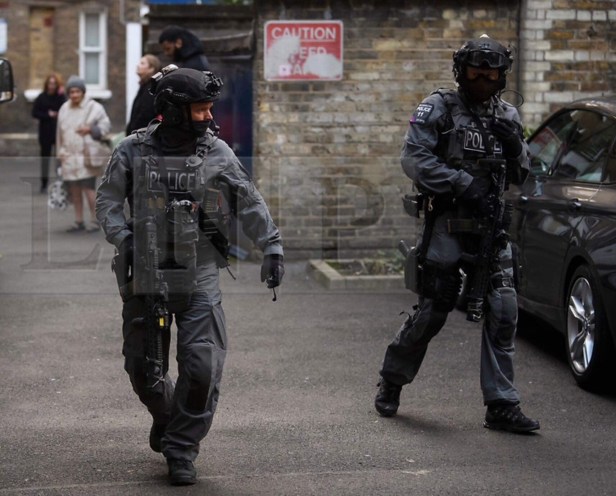
A CTSFO (Counter Terrorism Specialist Firearms Officer) is a member of the highest authorised group of Police Firearms Officers in the UK.
CTSFO teams were established by the Metropolitan Police in 2012, in the lead up to the London Summer Olympic Games – due to a heightened threat of potential terrorist attacks. Their job was to provide security to civilians and to react swiftly to terrorist threats.
CTSFOs can now be seen across the United Kingdom. The kit issued to them varies between regional teams. I, along with a few other impressionists, have taken quite a liking to the Metropolitan Police CTSFO kit.

Why CTSFO?
Now what drew me to this kit?
Well to start off with, you’d hard pressed to say that a fully matching Wolf Grey uniform wasn’t gucci; not forgetting to mention that its made by Arc’teryx LEAF.
That’s not all though: the rifle used (The Sig Sauer MCX) is not only chambered in the standard 5.56, but also 300. Black (which is cool in itself).
The CTSFO Impression Journey
I used to be a Crye or Die kind of guy, concentrating on UKSF impressions. However, with the recent exponential growth of the UKSF impression scene, I wanted to do something less ubiquitous.
I started to attend ITAS events and noticed a lad wearing a CTSFO kit, who many will know as Chris Tibbott (of The Cohort Blog). Now, his kit has come a long way since back then. As I saw his kit evolve, I started to gain more interest in it and did some research for myself. Now I’m absolutely glued tight to it!
So, fast forward a little bit. I do a bit of research, I look at reference pics and I get all excited – like any enthusiast does, looking at all these ally pictures with gucci kit. But here’s the issue: the price! So, I push the idea out of my mind and try to concentrate on a low vis police kit – which is more easily achievable and far less expensive.
I then ended up with a C2R plate carrier, then some Arc’teryx LEAF Assault Pants, then a shirt. Now here I am with empty pockets – but damn it was worth every penny!

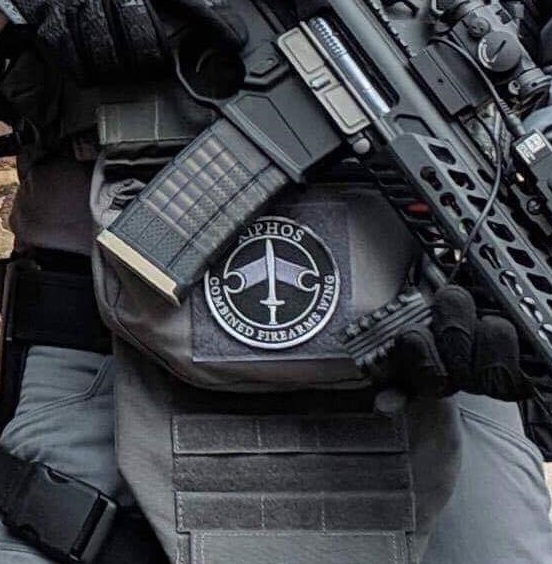
Recognition – Joining XIPHOS CFW
As my kit progressed I ended up getting an invite to join XIPHOS CFW – a group of lads who are passionate about delivering spot on Police impressions. And – with names such as Jay Taranis and Tom B from the E27 impression group; and Chris Tibbott from Task Force Warrior among the ranks – how could I say no?
Now let’s get into some important aspects of the kit, shall we?
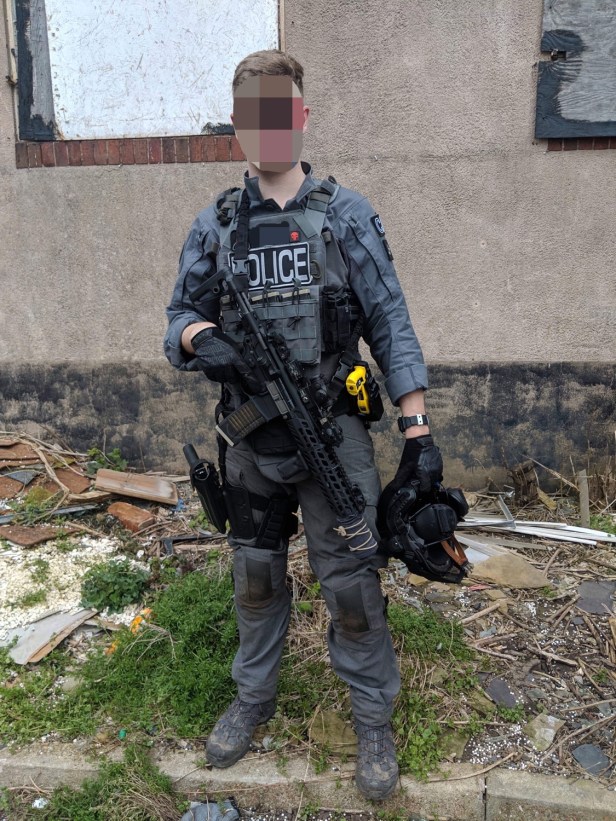
Uniform
Firstly, we’ve got the Wolf Grey Deadbird uniform. Now, you can either go with the LEAF Talos range or the Assault kit like I have. I must say that it’s some of the most comfortable clothing I have ever worn.
You can read reviews of the Assault Shirt and Assault Pants right here on The Reptile House.
Plate Carrier
Secondly there’s the Wolf Grey C2R-MOR Lite. This PC is an excellent distributor of load and is highly modular, with plenty of adjustment and MOLLE space.
There’s a review of this item on The Cohort Blog.
Footwear
Boots are usually down to personal preference. I use Salomons as I find them very comfortable and robust.
Lid
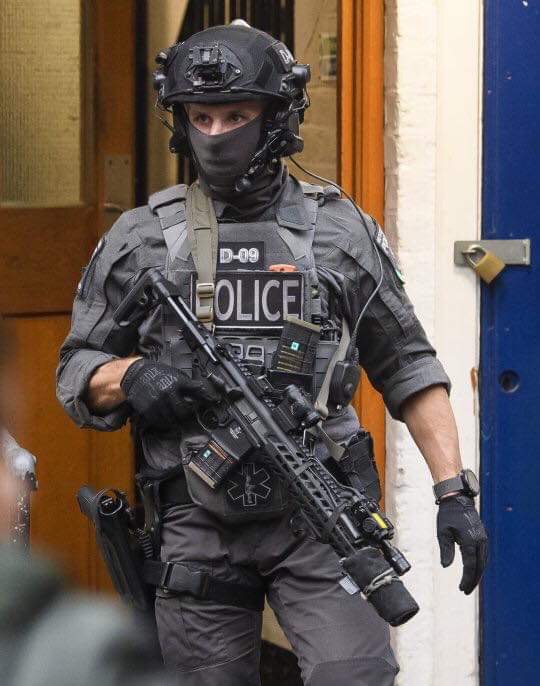
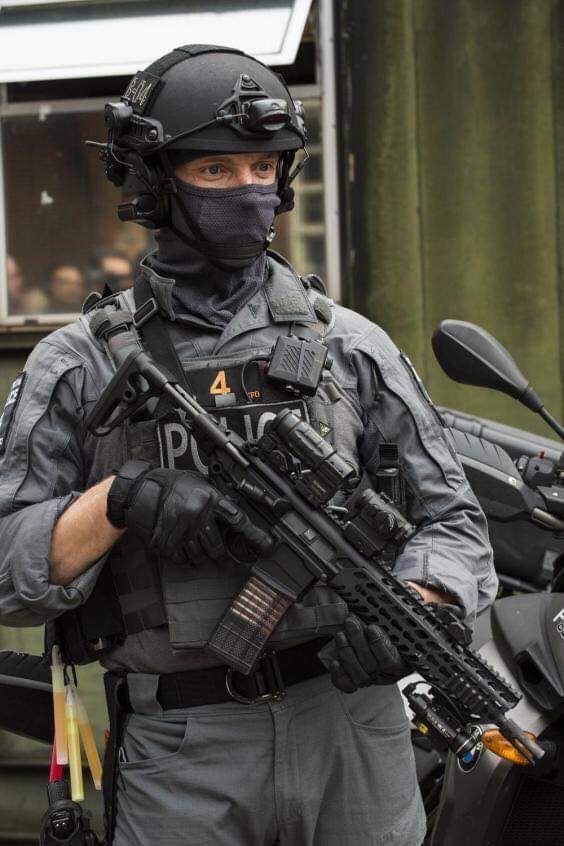
Now, in terms of my helmet build I’ve cut a few corners by going for repro kit (we can’t all be perfect, can we?)
I’ve gone for a black TMC Fast Helmet. It’s both comfortable and works fine for the look, but I’ve yet to repaint it and get the nice matt black finish the real steel OpsCores have. I’ll then get a C2R helmet cover.
Rifle
On to the rifle – everyone’s favourite part of a kit. I’m using a Cybergun Sig Sauer MCX (OEM’d by VFC).
Now, for a while I used mine stock, but it’s recently had a bit of a facelift. Instead of the rail it comes with, I’ve fitted a real steel Sig MCX suppressor compatible rail.
Along with that I’ve got a BCM vertical fore-grip, an ACE1ARMS T2 replica, a Surefire Scout Light and a black G&P DBAL.
For a suppressor I’m using an Angry Gun SOCOM 5.56. It’s not quite legit, but it works for now. I’m also using Lancer mags. They work perfectly for the look and I’ve spray painted the base plates Tan. This is to signify – for impression purposes – that my rifle is ‘chambered’ in 300. Black.
Overall, I’m quite pleased with the general performance and build quality of the gun. It’s snappy on the trigger, has great range and is generally quite accurate.
Kit Optimisation & Reference Pics
In terms of how I’ve set up my kit, it’s been trial and error.
Much of my general layout is based upon reference pics of CTSFO EMOE (Explosive Method Of Entry). However, I’m not limiting what I can do to reference pics. CTSFOs have pouches and tools placed where they are for a reason: accessibility! Every pouch attached to my rig and duty belt has been positioned so that I can easily access it in high speed, stressful situations.
I’ve got a few personal touches such as my prop TASER – courtesy of Rozzer Props. Not many CTSFOs have been seen with TASERs, but I like it, so why not?
A lot of the reference pics I’ve consulted are public and can easily be found online or in Facebook groups. That said, I thought I’d pick out some of my favourites and save the reader the trouble of opening another tab to search for them:

Knowledge Exchange
Not all of my knowledge has come from reference pics. I’ve had help from other CTSFO enthusiasts and impressionists. To say that one person knows everything would be very far from the truth – knowledge spreads in communities working in an open and collegiate way.
So, I’d like to thank the lads over at XIPHOS CFW for their help. I wouldn’t be where I am now without the tips, information and advice I’ve received from them.
How to Contact Jake
If anyone would like to ask further questions about my kit, I’d be happy to answer them. You can contact me through one of my Instagram accounts or on Facebook:
- IG @jake.bam.bycroft
- IG @jester3alpha
- FB Jake Bycroft
I’ll save you a bit of trouble – below is a detailed list of the kit I’ve used to create my impression.
Kit List
- Wolf Grey Arc’teryx Assault Pants
- Black Arc’teryx Knee Caps
- Wolf Grey Arc’teryx Assault Shirt
- Grey Salomon boots
- Black Mechanix Gloves
- TMC Black Fast Helmet
- Black Peltor Comtacs
- Black Arc Rail Adapters
- TMC Black mesh mask
- Black Petzl head torch
- Wolf Grey C2R-MOR Lite
- Aegis level 3 armour plates
- Met Police Duty belt
- Black Safariland G17 holster with hood and lock
- Assortment of black 5.11 pouches
- ITW Fast mag
- Platicuffs / Zip Cuffs
- Assortment of patches
RIFs
- Cybergun Sig MCX
- Genuine SIG MCX suppressor compatible rail
- Black G&P DBAL
- Black BCM foregrip
- Black Surefire Scout light
- Black Ace1Arms T2
- WE G17
There you have it!
You’ve got the list, you’ve got the knowledge; all you need now is the determination to make it real.
I’ve still got a few bits to get, but can you really call yourself an impressionist if there isn’t another small detail you need to ‘complete’ your kit?
