

Words: John Danter
Pics: Alfred Encallado
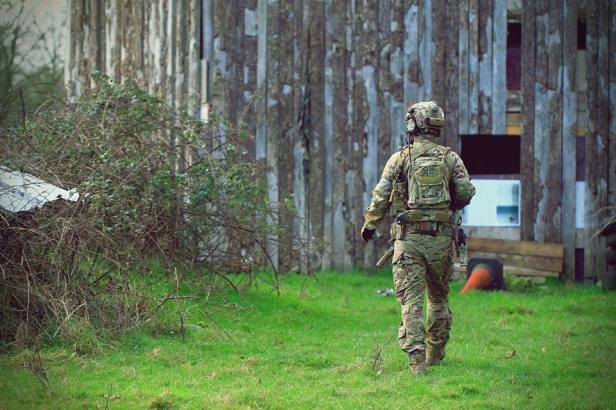
I wrote about my UKSF-inspired lid back in Dec 2017. This article is an update as to where it is now, and also highlights the fact that I am done upgrading it…I think.
Changes from the ‘old’ build include new rails, totally new padding, a new retention system and a new comms headset.
Keen eyed readers will also notice that in the pics which accompany this article, I’m wearing a Crye Precision G4 Combat Shirt.
It’s awesome.
It’s incredibly streamlined and moves with you better than anything Crye has designed in the past. It’s like the missing link between tough combat gear and adrenaline performance wear. The stretch NyCo on the arms is like nothing that’s gone before; just 2% stretch makes it feel entirely different, ergonomic and allows the shirt to be free of bulk. Not only that but it’s wicking and fast drying.
I’ll never go back to AC or G3 now. Roll on the Combat Pants! Rich (The Reptile House) bought one, too – so expect a detailed and judicious review from him, soon.


Back to the substantive subject of this article and UKSF are well known to use the Ops Core high cut Maritime helmet.
My lid is based around an FMA Maritime shell, but that is all that is left of the original repro kit. The rest is composed of genuine real world parts which have been slowly added over time, based on ergonomic fine tuning and info obtained from reference pics and trusted sources.


To help with the never ending ergonomic fine tuning, I regularly wear my impression kit to walk-on games. Bread and butter skirmishes are absolutely essential to my methodology and without them I wouldn’t be in a position to fully enjoy the milsim and realsim events I attend throughout the year.
I’d been feeling that my helmet padding – whilst comfortable – was perhaps too bulky. I also suffered from insane perspiration due to the existing setup. There’s nothing worse than putting back on a cold damp helmet, dripping with sweat. Now this is no doubt a bugbear of real world guys too – with issued kit – and I should just suck it up as they do; but there are a few things you can do to help yourself.


Getting the size of the FMA helmet right was tricky, as I am between sizes. I didn’t want to look like a Super Mario Cart mushroom, so went for the smaller size and adjusted the padding to suit. This is also why I downsized the XP rails for Skeleton rails. These are visually smaller in profile and also offer a few small advantages for cable routing.
Pad placement! Everyone’s head is a different shape. Some are oval front and back, others – like Stewie in Family Guy – are oval left and right; others still are perfectly round.
It’s worth paying attention to what profile you are, in order to get the best fit through the padding layout. You may need more padding on the sides vs. others needing the front and back, etc.

Try to create spaces in between your helmet pads for air flow. The way I had my Lux Liner set up didn’t really allow for this. The pads were the same size and crammed together so it was like a beanie hat of pads, really.
I asked on the UKSF Impression/Reference Group for help and advice on what others had done. It’s a really friendly group, with new content daily, and I highly recommend it for on-point UKSF knowledge.
Lots of guys on the group recommended the 4D Tactical Deluxe Retrofit Pad. Interestingly enough, these pads are very much like the old Crye Zorbium pads from my old Airframe (god I miss that lid) and I never had sweating there.
The 4D pads are different sizes and allow for spaces, so I got a set in.
They are brilliant and so much softer than Crye pads. They are designed to wick and absorb sweat as well as conform to your head.
I also added some spare Team Wendy Epic pads which are quite thin in places. So now I have a perfect combination of thick and thin pads to suit my head shape. My helmet is now – finally – a total joy to wear for long periods and sweat does not build up anywhere near as much as before.


Another new addition is the Team Wendy Cam Fit system. Think bondage for your head, that always remembers the safe word ( it’s “Jellyfish” BTW). I’ve made a concession on this because AFAIK there are no public pics of it in use with UKSF, but this system is much better than anything else I’ve used. I suspect/hope reference pics will emerge at some point.
Most helmet systems use the traditional four points of fastening: two front, two rear. The Team Wendy system – thanks to the clever way of joining up each of the side points – uses six points of fastening. The extra two points are more of a padded ‘band’ that runs along the top of your ears, front to back. It also has a BOA dial attached to the nape of your neck. This sits on a rear pad that helps fine tune tightening for the correct pressure. It’s the two extra bands that tighten as the neck gets pulled in.


The fact that you don’t need to over-tighten your helmet helps get airflow around the pads, as they are not scrunched-up and flattened-out. Having said that, the tension needs to be different when I add NV – obviously – because of the additional weight and change in leverage. To compensate, I like to tighten the lid a bit more than usual. The cam fit it great for that.
I used a Cam Fit on my old Airframe, thanks to a top tip from Tactical Optician. I was gutted when starting out on my UKSF impression, that I hadn’t seen any pics of a Cam Fit in use. This may be because Ops Core supplies its own systems: OCC and Worm Dials, etc. These were covered in Part 1.

Fit tips!
Don’t loosen your straps too much, as a good fitted helmet will help you if you do take a tumble – ballistic or not. Same as a cycling helmet, you should not be able to push a fastened helmet off your head by pushing the helmet backwards. Likewise, you shouldn’t be able to push a helmet forwards from the rear and have it fall down over your eyes. The front straps stop the helmet falling backwards. The rear straps do the reverse. Get a good balance between them both. You should be able to open your jaw and mouth a bit before you feel the tension pull.
I also upgraded my headset from Comtac III dual comm to Peltor XPIs. I rarely used dual comms and felt it was time to upgrade to more modern kit.

Note to anyone else looking for XPIs, there are actually 16 models! They vary over the mic type and down lead options, etc. There is also a difference in the NATO and non-NATO versions out there, and most look exactly the same. The difference is the reversal of the pins for the mic and earpiece. JCI Comms can help you out there, if you fall foul of the wrong model and compatibility with your PTT.

The Princeton Tec MPLS Switch was spotted in recent reference pics, so that remains on.
I am tempted to switch to the Orion Design Group (ODG) Maritime cover, but I promised myself I’d stop tinkering with my helmet.
Parts List:
FMA Maritime Ops Core shell with upgraded parts
Lux Liner shell – Pads removed
4D Tactical Deluxe Retrofit Pads and Team Wendy pads
Ops Core Skeleton shroud
Ops Core Skeleton rails (over normal)
Wilcox G24
Ops Core counterweight
Ops Core Maritime velcro set
First Spear Solid Stretch cover
Helstar 6 IR strobe
Core Survival Attach Patch for Helstar
2 S&S V-lites (red and green)
Princeton Tec Switch MPLS
Peltor XPI single comm headset
Peltor rail adaptors
*Denotes repro

